2016年7月31日 星期日

Python_Note19

Python_OpenCV

參考資料:

OpenCV3.1版官方手冊 (完全沒有Python的範例 2016/08/01)
http://docs.opencv.org/3.1.0/#gsc.tab=0

OpenCV3.0-beta官方手冊 (這個版本比較完整,有針對Python的指令及範例,建議新手可以查這個,有問題再去看最新版)
http://docs.opencv.org/3.0-beta/index.html

OpenCV-Python Tutorials
(這是官方出的教學指南,下面兩個網址內容都一樣,也有PDF檔可下載)
http://docs.opencv.org/3.2.0/d6/d00/tutorial_py_root.html  (OpenCV 3.2 for Python, 2017/3/31更新)
http://docs.opencv.org/3.0-beta/doc/py_tutorials/py_tutorials.html
https://opencv-python-tutroals.readthedocs.io/en/latest/py_tutorials/py_tutorials.html

Install OpenCV-Python in Windows

參考:Python_install OpenCV-3.1、或官方手冊 Install OpenCV-Python in Windows

cv2.VideoCapture() 

在進行跟讀寫影像檔有關的指令時,會沒有作用。此外,如果是檔案讀寫不成功時,此模組也不會出現error,所以如果程式沒有照預想的情況執行卻有沒有error,應該是ffmpeg沒設環境變數的關係,譬如在  Playing Video from file 這個示範例中,
import numpy as np
import cv2

cap = cv2.VideoCapture('vtest.avi')

while(cap.isOpened()):
    ret, frame = cap.read()

    gray = cv2.cvtColor(frame, cv2.COLOR_BGR2GRAY)

    cv2.imshow('frame',gray)
    if cv2.waitKey(1) & 0xFF == ord('q'):
        break

cap.release()
cv2.destroyAllWindows()
  • 執行後沒反應就是編碼這邊有問題。手冊裡寫:Note: Make sure proper versions of ffmpeg or gstreamer is installed. Sometimes, it is a headache to work with Video Capture mostly due to wrong installation of ffmpeg/gstreamer. 
  • 因為OpenCV在讀寫影像檔時會執行ffmpeg來編譯,但是若環境變數沒設定,則會無法編譯而導致後續無法進行影像處理的問題。
  • 解決方式:將ffmpeg的檔案位置增加到環境變數即可。注意,這裡要看使用者是直接用opecvbuild的環境,還是自己build的環境,兩邊都會有ffmpeg檔,要選對的檔案的資料夾位置來加入環境變數。譬如我的是 D:\library\opencv3.1-pythonbuild\bin\Release;,而不是OpenCV的所在位置 D:\library\opencv3.1\build\bin。或者將opencv_ffmpeg310_64.dll 複製到python資料夾下 ( 我的是C:\Anaconda3 )也可以。

Drawing Functions in OpenCV

OpenCV基本幾何畫圖函數有:
  • cv2.line(img, pt1, pt2, color[, thickness[, lineType[, shift]]]) → img
  • cv2.circle(img, center, radius, color[, thickness[, lineType[, shift]]]) → img
  • cv2.rectangle(img, pt1, pt2, color[, thickness[, lineType[, shift]]]) → img
  • cv2.ellipse(img, center, axes, angle, startAngle, endAngle, color[, thickness[, lineType[, shift]]]) → img
  • cv2.ellipse(img, box, color[, thickness[, lineType]]) → img
  • cv2.polylines(img, pts, isClosed, color[, thickness[, lineType[, shift]]]) → img 
  • cv2.putText(img, text, org, fontFace, fontScale, color[, thickness[, lineType[, bottomLeftOrigin]]]) → Nonev2.putText()

上述函數皆有以下引數 (argument):
  • img : The image where you want to draw the shapes
  • color : Color of the shape. for BGR, pass it as a tuple, eg: (255,0,0) for blue. For grayscale, just pass the scalar value.
  • thickness : Thickness of the line or circle etc. If -1 is passed for closed figures like circles, it will fill the shape. default thickness = 1
  • lineType : Type of line, whether 8-connected, anti-aliased line etc. By default, it is 8-connected. cv2.LINE_AA gives anti-aliased line which looks great for curves. 

範例:Logo of OpenCV
import numpy as np
import cv2
#create a black image
img = np.zeros((800,557,3),np.uint8)

#convert the black image into white image
img = img + 255

img = cv2.ellipse(img,(281,133),(128,128),0,120,420,(0,0,255),-1)
img = cv2.circle(img,(281,133), 42, (255,255,255), -1)

img = cv2.ellipse(img,(138,384),(128,128),0,0,300,(0,255,0),-1)
img = cv2.circle(img,(138,384), 42, (255,255,255), -1)

img = cv2.ellipse(img,(419,384),(128,128),0,-60,240,(255,0,0),-1)
img = cv2.circle(img,(419,384), 42, (255,255,255), -1)


font = cv2.FONT_HERSHEY_SIMPLEX
cv2.putText(img,'OpenCV',(35,650), font, 4,(0,0,0),15,cv2.LINE_AA)

cv2.imshow('image',img)
cv2.waitKey(0)
cv2.destroyAllWindows()

Out:


Events in OpenCV

>>> import cv2
>>> events = [i for i in dir(cv2) if 'EVENT' in i]
>>> print events
['EVENT_FLAG_ALTKEY', 'EVENT_FLAG_CTRLKEY', 'EVENT_FLAG_LBUTTON', 'EVENT_FLAG_MBUTTON', 'EVENT_FLAG_RBUTTON', 'EVENT_FLAG_SHIFTKEY', 'EVENT_LBUTTONDBLCLK', 'EVENT_LBUTTONDOWN', 'EVENT_LBUTTONUP', 'EVENT_MBUTTONDBLCLK', 'EVENT_MBUTTONDOWN', 'EVENT_MBUTTONUP', 'EVENT_MOUSEHWHEEL', 'EVENT_MOUSEMOVE', 'EVENT_MOUSEWHEEL', 'EVENT_RBUTTONDBLCLK', 'EVENT_RBUTTONDOWN', 'EVENT_RBUTTONUP']


2016年7月26日 星期二

Python_Note18

Python_GUI

Python有許多GUI套件,有跟C結合的PyQt、跟Java結合的Jypthon、.net的Ironpython,以及內建的 Tkinter。新手推薦從Tkinter來作為開始,藉此學習GUI的程式架構、以及演算法程式如何與GUI結合,可以幫助在設計演算法時考慮兩者之間的關係,優化架構,新手如我就是run code的時候都很好,整合到GUI時才發現很多沒考慮到的部分需要修改,然後牽一髮動全身,差不多動了60%吧,200行的小程式就改的累死了,更何況是上千行的程式碼

Python_Tkinter

參考資料:
http://www.java2s.com/Code/Python/GUI-Tk/CatalogGUI-Tk.htm
http://www.tkdocs.com/tutorial/index.html
http://www.tutorialspoint.com/python/python_gui_programming.htm

影片教學:(推薦看這個,很快就能上手了)
https://www.youtube.com/watch?v=RJB1Ek2Ko_Y&list=PL6gx4Cwl9DGBwibXFtPtflztSNPGuIB_d

Tkinter Widgets

Tkinter提供15種核心widgets以及ˋ4種進階工具,下列每個Operator都可以直接點連接查詢個別的控制參數以及更詳細的用法。
OperatorDescription
The Button widget is used to display buttons in your application.
The Canvas widget is used to draw shapes, such as lines, ovals, polygons and rectangles, in your application.
The Checkbutton widget is used to display a number of options as checkboxes. The user can select multiple options at a time.
The Entry widget is used to display a single-line text field for accepting values from a user.
The Frame widget is used as a container widget to organize other widgets.
The Label widget is used to provide a single-line caption for other widgets. It can also contain images.
The Listbox widget is used to provide a list of options to a user.
The Menubutton widget is used to display menus in your application.
The Menu widget is used to provide various commands to a user. These commands are contained inside Menubutton.
The Message widget is used to display multiline text fields for accepting values from a user.
The Radiobutton widget is used to display a number of options as radio buttons. The user can select only one option at a time.
The Scale widget is used to provide a slider widget.
The Scrollbar widget is used to add scrolling capability to various widgets, such as list boxes.
The Text widget is used to display text in multiple lines.
The Toplevel widget is used to provide a separate window container.
The Spinbox widget is a variant of the standard Tkinter Entry widget, which can be used to select from a fixed number of values.
A PanedWindow is a container widget that may contain any number of panes, arranged horizontally or vertically.
A labelframe is a simple container widget. Its primary purpose is to act as a spacer or container for complex window layouts.
This module is used to display message boxes in your applications.

Standard attributes

widget有下列基本屬性可以設定:

Geometry Management

Tkinter 提供的widgets都具有下列三種方法 (methods) 來設定位置:
  • The pack() Method - This geometry manager organizes widgets in blocks before placing them in the parent widget.
  • The grid() Method - This geometry manager organizes widgets in a table-like structure in the parent widget.
  • The place() Method -This geometry manager organizes widgets by placing them in a specific position in the parent widget.

範例:

from tkinter import *

root = Tk()           #主視窗
root.title("Element Number Analysis")          #主視窗的名稱

frame_1 = Frame(root)                    #框架1(設置於主視窗root中)

frame_1.pack(side = LEFT, fill = Y)  
#pack:封裝至root中
#另一種寫法是 frame_1 = Frame(root).pack(side = LEFT, fill = Y)
#不過在某些情況會不行,若是編譯有Error時,
#不彷看看是不是這邊的問題。
#side = LEFT:fram1在root中的位置為左邊
#fill = Y :fram1填滿上下界
#其中控制參數都必須要大寫,ex:LEFT、Y

frame_2 = Frame(root)                    #框架2(設置於主視窗root中)
frame_2.pack(side = LEFT, fill = Y)
frame_3 = Frame(root)                    #框架3(設置於主視窗root中)
frame_3.pack(side = LEFT, fill = Y)

Scrollbar1 = Scrollbar(frame_1)               #捲軸1(設置於框架1)
Scrollbar1.pack( side = RIGHT, fill=Y )      
#打包封裝至框架1中,且位置靠右側,並填滿上下界

Scrollbar2 = Scrollbar(frame_2)               #捲軸1(設置於框架2)
Scrollbar2.pack( side = RIGHT, fill=Y )

label_1 = Label(frame_1, text = '請輸入實施方式')
#標籤1(設置於框架1,標籤名稱為請輸入實施方式)

label_1.pack(side = TOP)            #打包封裝至框架1中,且位置靠上方

label_2 = Label(frame_2, text = '元件符號分析結果')
#標籤2(設置於框架2,標籤名稱為請輸入實施方式)

label_2.pack(side = TOP)            #打包封裝至框架2中,且位置靠上方


Retrive_input = Text(frame_1,yscrollcommand = Scrollbar1.set)
#輸入文字欄Text(設置於框架1),
#yscrollcommand = Scrollbar1.set:在y軸設有捲軸1,
#根據捲軸1的控制參數可以知道捲軸會在框架1內的右側。

Retrive_input.pack(side = RIGHT,fill = Y)     
#打包封裝至框架1中,且位置靠右,但捲軸1已先設置於右側,
#所以Text會在其左側。

Scrollbar1.config( command = Retrive_input.yview )
#前面只是讓捲軸1出現在視窗上而已,
#要讓捲軸1能動需加此命令 ,
#Retrive_input.yview :捲動捲軸1時文字欄是視窗做y軸方向移動。

Output_result = Text(frame_2,yscrollcommand = Scrollbar2.set)
Output_result.pack(side = RIGHT,fill = Y)
Scrollbar2.config( command = Output_result.yview )
#同上 

Button = Button(frame_3, text="Analyze", command=analyze)
#按鈕設置於框架3,標題為'Analyze',
#而Button的command對應的是一個函數 analyze,
#亦即按下Button後就會執行analyze。

Button.pack(side = BOTTOM)         #打包封裝Button至框架3,且位置在底部

root.mainloop()      #進入訊息循環,才不會按完就跳掉。


若是要放置圖片,可以以label方式加入,先利用 PhotoImage(file= 'image.PNG') 讀檔,然後在label中加入控制參數 image = logo 即可,不過有圖片檔的腳本轉成exe檔比較複雜,無法直接用pyinstaller xxx.py來轉。

logo = PhotoImage(file= 'image.PNG')
label_3 = Label(frame_3, image = logo)
label_3.pack(side = BOTTOM)


2016年7月25日 星期一

Python_Note17

.py to exe

Python的.py檔無法在未安裝Python編譯器的系統上直接執行,因此需要打包轉成exe檔。Python有許多.py檔轉成exe檔的套件,包刮py2exe、cx_Freeze、Pytinstaller,前兩個我試過各種一般正常教學方式安裝,都無法正常使用,可能是python3.x版不支援關係、也可能是中文編碼問題,總之就是轉不成功。Pyinstaller在win7 + Pyyhon3.5 + PyCharm下是可以成功轉檔的。

Pyinstaller

Pyinstaller的安裝也並非一次就成功 [ 2016/07/14],在cmd下執行 pip install pyinstaller 會無法順利安裝,出現 UnicodeDecodeError: 'cp950' codec can't decode byte 0xe2 in position 208687,似乎是big5編碼環境造成的,因此必須安裝開發版本,安裝方法如下:
1. Pyinstaller的官方網站 http://www.pyinstaller.org/,找下方藍色背景的開發版本,並右鍵選複製連結網址,https://github.com/pyinstaller/pyinstaller/tarball/develop

2.然後到cmd下執行
pip install https://github.com/pyinstaller/pyinstaller/tarball/develop
即可安裝網址提供的開發版本,就能順利安裝了。 (Python_pip 介紹)

PyInstaller 會分析 code,然後收集需要的 module 和 library 甚至包括 Python interpreter
和原始碼打包成一個文件夾或單一可執行文件(exe檔)。

使用方式:
執行 pyinstaller myscript.py

執行以上命令,PyInstaller 會做以下事情:
  1. 建立一個 myscript.spec
  2. 建立一個 build 資料夾
  3. 建立一些 log & 工作檔案在 build 中
  4. 建立一個 dist 資料夾 (此資料夾用來分享給別人)
  5. 建立執行檔在 dist 資料夾
簡單示範:
  1. 在要轉成exe的.py檔的資料夾下,執行 pyinstaller myscript.py 。
  2. 執行完後會在同個資料夾下產生[build] 跟 [dist] 資料夾,exe執行檔以及dll等各種檔案會存在 [dist] 資料夾中同myscript檔名資料夾內。
  3. 整個資料夾打包給別人,要使用時就執行myscript.exe檔即可。
...


倘若想要打包成只有exe檔等情況,也可以使用一些參數來達成。例如打包成一個exe檔案只要將執行命令改成pyinstaller myscript.py -F

參數

-h--helpshow this help message and exit
-v--versionShow program version info and exit.
--distpathDIRWhere to put the bundled app (default: ./dist)
--workpath WORKPATH
Where to put all the temporary work files, .log, .pyz and etc. (default: ./build)
-y--noconfirm
Replace output directory (default: SPECPATH/dist/SPECNAME) without asking for confirmation
--upx-dir UPX_DIR
Path to UPX utility (default: search the execution path)
-a--asciiDo not include unicode encoding support (default: included if available)
--cleanClean PyInstaller cache and remove temporary files before building.
--log-level LEVEL
Amount of detail in build-time console messages. LEVEL may be one of DEBUG, INFO, WARN, ERROR, CRITICAL (default: INFO).
-D--onedirCreate a one-folder bundle containing an executable (default)
-F--onefileCreate a one-file bundled executable.
--specpathDIRFolder to store the generated spec file (default: current directory)
-n NAME--name NAME
Name to assign to the bundled app and spec file (default: first script’s basename)


2016年7月19日 星期二

Python_pip

Python除了standard library之外,也有許多好用的第三方模組 (Module),例如科學運算常用的Numpy、Panda,俗語說「DRY, Don't Repeat Yourself」,別人已經寫好的東西,不用再花時間去重新寫。而且現在連安裝管理套件 (package)的模組都有,以下介紹其中一種比較好上手的安裝套件 pip

pip

  • pip可正常運作在Windows、Mac OS、Unix/Linux等作業系统上
  • 需要至少2.6+和3.2+的CPython版本
  • python 2.7.9 和3.4以后的版本已經內建pip程式,所以不需要另外安装。其他的版本可以使用以下命令進型安裝
  1. 下載   https://bootstrap.pypa.io/get-pip.py
  2. 安裝( Linux下需要root權限)
  3. 於command line模式下執     python get-pip.py
  4. 加入環境變數( Windows)
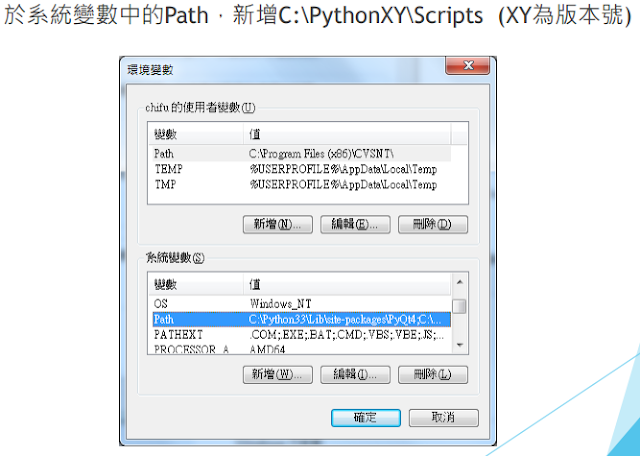
  5. 將 C:\Python34\Scripts 加進PATH

環境變數設定


使用方式

  • 安裝套件
pip help (列出 pip 使用範例)
pip install SomePackage (自動安裝最新版本)
pip install SomePackage==1.0.4 (指定版本)
pip install 'SomePackage>=1.0.4' (指定最小版本)
pip install https://github.com/pyinstaller/pyinstaller/tarball/develop
pip freeze (列出所有已安裝的套件)
C:\Users\cash.chien\PycharmProjects\element_number>pip freeze
alabaster==0.7.7
anaconda-client==1.4.0
anaconda-navigator==1.1.0
argcomplete==1.0.0
. . .

  • 更新套件
pip install -U SamePackage
  • 刪除套件
pip uninstall SomePackage


範例:以生成QRCode的套件為例
一開始在沒有安裝pyqrcode套件之前,會無法import pyqrcode 模組,

In[4]: import pyqrcode
Out:
Traceback (most recent call last):
  File "C:\Anaconda3\lib\site-packages\IPython\core\interactiveshell.py", line 2885, in run_code
    exec(code_obj, self.user_global_ns, self.user_ns)
  File "<ipython-input-4-03967d533bd2>", line 1, in <module>
    import pyqrcode
  File "C:\Program Files (x86)\JetBrains\PyCharm Community Edition 2016.1.4\helpers\pydev\_pydev_bundle\pydev_import_hook.py", line 21, in do_import

接著利用pip來安裝pyqrcode套件
在cmd下 (或PyCharm中的Terminal、powershell)  輸入 pip install pyqrcode

就會開始安裝
C:\Users\cash.chien\PycharmProjects\element_number>pip install pyqrcode
Collecting pyqrcode
  Downloading PyQRCode-1.2.1.zip (41kB)
    100% |████████████████████████████████| 51kB 445kB/s                                                                                       
Building wheels for collected packages: pyqrcode
  Running setup.py bdist_wheel for pyqrcode ... done
  Stored in directory: C:\Users\cash.chien\AppData\Local\pip\Cache\wheels\79\84\80\5909ca01732597bfd7d04d368689dc1c84736f9314fed2003a
Successfully built pyqrcode
Installing collected packages: pyqrcode
Successfully installed pyqrcode-1.2.1

看到Siccessfully installed pyqrcode-1.2.1就是安裝成功,有時候安裝不成功有很多原因,譬如我在安裝Pyinstaller套件時,就一直安裝不好,有時候是版本不同,或者套件本身有問題(像是不支援中文之類的...),遇到時只能Google來找尋解決方法了。

安裝好後就來help(pyqrcode)看看是否成功

In[10]: help(pyqrcode)

Out:
Help on package pyqrcode:

NAME
    pyqrcode

DESCRIPTION
    This module is used to create QR Codes. It is designed to be as simple and
    as possible. It does this by using sane defaults and autodetection to make
    creating a QR Code very simple.
    
    It is recommended that you use the :func:`pyqrcode.create` function to build the
    QRCode object. This results in cleaner looking code.
    
    Examples:
            >>> import pyqrcode
            >>> import sys
            >>> url = pyqrcode.create('http://uca.edu')
            >>> url.svg(sys.stdout, scale=1)
            >>> url.svg('uca.svg', scale=4)
            >>> number = pyqrcode.create(123456789012345)
            >>> number.png('big-number.png')
.
.
.


可以看到安裝成功,並有簡介跟使用範例等,接著就來使用pyqrcode做一個網址的QRCode試試看。

# pyqrcode 使用範例
#
from pyqrcode import QRCode 
url = QRCode('http://ccfml.blogspot.tw/') 
#輸出SVG格式檔案:url.svg ,縮放比為10
url.svg('url.svg', scale=10) 
#輸出PNG格式檔案:url.png ,縮放比為10
#url.png('url.png', scale=10)

執行完後在同個資料夾下產生了一個url.svg檔,如下。


藉由上面例子可以知道Python社群已經提供各式各樣的模組,光Python 3.x版的就有4萬多個,因此有甚麼需求都可以先搜尋看看。

Python 3 package list

Python3全部的package清單


2016年7月3日 星期日

Python_Note16

Regular expression operations

參考資料:

正規表示式使用單個字串來描述、符合一系列符合某個句法規則的字串。在很多文字編輯器裡,正則運算式通常被用來檢索、取代那些符合某個模式的文字,並且藉此從檔案中抓取出想要的內容。

正規表示式的大致匹配過程是:
  1. 依序拿出表達式和文本中的字符比較,
  2. 如果每一個字符都能匹配,則匹配成功;一旦有匹配不成功的字符則匹配失敗。
  3. 如果表示式中有量詞或邊界,這個過程會稍微有一些不同。
Python已經內建正規表示式模組re,引入方式為  import re

常用的方法:

  • re.compile(string[,flag])
  • re.match(pattern, string[, flags]

這個方法將會從string(我們要匹配的字符串)的開頭開始,嘗試匹配pattern,一直向後匹配,如果遇到無法匹配的字符,立即返回None,如果匹配未結束已經到達string 的末尾,也會返回None。兩個結果均表示匹配失敗,否則匹配pattern 成功,同時匹配終止,不再對string 向後匹配。

  • re.search(pattern, string[, flags]

searrch方法與match 方法極其類似,區別在於match() 函數只檢測re 是不是在string的開始位置匹配,search() 會掃描整個string 查找匹配,match()只有在0位置匹配成功的話才有返回,如果不是開始位置匹配成功的話,match() 就返回None

  • re.split(pattern, string[, maxsplit]

按照能夠匹配的子串將string 分割後返回列表。maxsplit 用於指定最大分割次數,不指定將全部分割。

  • re.findall(pattern, string[, flags]

搜索string,以列表形式返回全部能匹配的子串。

  • re.finditer(pattern, string[, flags]

搜索string,返回一個順序訪問每一個匹配結果(Match對象)的迭代器。

  • re.sub(pattern, repl, string[, count]

使用repl 替換string 中每一個匹配的子串後返回替換後的字符串。當repl 是一個字符串時,可以使用\id \g\g 引用分組,但不能使用編號0。當repl 是一個方法時,這個方法應當只接受一個參數(Match對象),並返回一個字符串用於替換(返回的字符串中不能再引用分組)。count 用於指定最多替換次數,不指定時全部替換。

  • re.subn(pattern, repl, string[, count]

返回(sub(repl, string[, count]), 替換次數)


其中,參數flag 是匹配模式,取值可以使用按位或運算符'|'表示同時生效,比如re.I | re.M。上述七個方法中的flags 同樣是代表匹配模式的意思,如果在pattern 生成時已經指明了flags,那麼在之後的方法中就不需要傳入這個參數了。

參數可選值:
re.I(全拼:IGNORECASE
忽略大小寫(括號內是完整寫法,下同)
re.M(全拼:MULTILINE
多行模式,改變'^''$'的行為(參見上圖)
re.S(全拼:DOTALL
點任意匹配模式,改變'.'的行為
re.L(全拼:LOCALE
使預定字符類\w \W \b \B \s \S 取決於當前區域設定
re.U(全拼:UNICODE
使預定字符類\w \W \b \B \s \S \d \D 取決於unicode定義的字符屬性
re.X(全拼:VERBOSE
詳細模式。這個模式下正則表達式可以是多行,忽略空白字符,並可以加入註釋。


正規表示式的一些匹配規則:

範例:
In[8]: import re
In[9]: string = 'abc12dedg345hi67jklm8910'
In[10]: pat = '...\d\d'    #3個字符+2個數字
In[11]: print(re.findall(pat,string))     #找匹配pat的字串並儲存為list
['abc12', 'edg34', '5hi67', 'klm89']
In[12]: pat = '...\d\d\d'    #3個字符+3個數字
In[13]: print(re.findall(pat,string))
['edg345', 'klm891']
In[14]: pat = '...\d\d\d\d'    #3個字符+4個數字
In[15]: print(re.findall(pat,string))
['klm8910']
In[16]: pat = '\d\d'        #2個數字
In[17]: print(re.findall(pat,string))
['12', '34', '67', '89', '10']